
选项是 WordPress 中最重要的数据,它们存储各种配置设置(查看更多)。它们也像其他重要数据(例如帖子、页面等)一样包含在数据库中。日复一日,这些选项可以由 WordPress 本身或用户更改。那么如何在不记住每个确切值的情况下将它们配置回之前的状态呢?
在本教程中,我将向您展示如何为您的 WordPress 博客创建简单的备份/恢复功能。使用此功能,您可以将所有选项备份到另一个位置,您可以随时从中恢复它们,而无需再次配置它们。
开始之前
一般来说,我们的功能将分为两个部分,一个是用于备份数据的导出部分和一个用于恢复数据的导入部分。因此,我将通过创建一个简单的插件来演示这些。
第 1 步 插件标头
首先,我必须写几行来告诉 WordPress 我们的插件。
/*
Plugin Name: I/E Option
Plugin URI: https://code.tutsplus.com
Description: This is a sample plugin with backup and restore options feature.
Author: Lee Pham
Version: 1.0
Author URI: http://twitter.com/leephamj
*/
这是我们的结果:

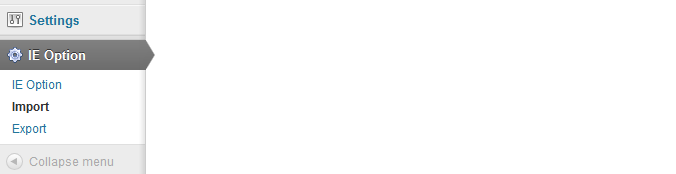
第2步创建页面管理员
现在我们需要一个地方来放置我们的插件界面,它显示了上面提到的两个关键功能(包括导入和导出功能)。所以我在管理部分生成一个页面:
function register_ie_option() {
	add_menu_page('IE Option Page', 'IE Option', 'activate_plugins', 'ie-option', 'ie_option_page', '', 76);
	add_submenu_page('ie-option', 'Import', 'Import', 'activate_plugins', 'ie-import-option', 'ie_import_option_page');
	add_submenu_page('ie-option', 'Export', 'Export', 'activate_plugins', 'ie-export-option', 'ie_export_option_page');
}

function ie_option_page() {
	// Our stuff here
}

function ie_import_option_page() {
	// Content Import Feature
}

function ie_export_option_page() {
	// Content Export Feature
}
add_action('admin_menu', 'register_ie_option');
以下是一些要点:
- 我们使用
add_menu_page作为内置 WordPress 函数,在管理菜单侧边栏中添加新的顶级菜单部分,其中ie_option_page参数是用于输出页面内容的回调函数。 - 为了将两个主要功能分成不同的部分,我们使用
add_submenu_page将它们添加到我们上面刚刚创建的顶级菜单中。如您所见,每个函数还有一个回调函数来显示输出内容,就像add_menu_page函数一样。如果您将它们合并到一个地方并不重要,我只是尽力保持清晰。 - 然后我们将
register_ie_option挂钩到admin_menu操作,以便在每次调用此操作时触发我们的目标。
第3步创建导出功能
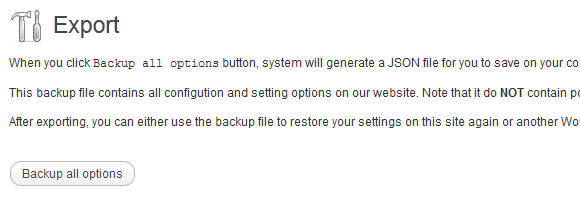
我计划创建一个像这样的导出页面:
创建导出页面骨架
function ie_export_option_page() {
	if (!isset($_POST['export'])) {
		?>
		<div class="wrap">
			<div id="icon-tools" class="icon32"><br /></div>
			<h2>Export</h2>
			<p>When you click <tt>Backup all options</tt> button, system will generate a JSON file for you to save on your computer.</p>
			<p>This backup file contains all configution and setting options on our website. Note that it do <b>NOT</b> contain posts, pages, or any relevant data, just your all options.</p>
			<p>After exporting, you can either use the backup file to restore your settings on this site again or another WordPress site.</p>
			<form method='post'>
				<p class="submit">
					<?php wp_nonce_field('ie-export'); ?>
					<input type='submit' name='export' value='Backup all options'/>
				</p>
			</form>
		</div>
		<?php
	}
	elseif (check_admin_referer('ie-export')) {
		// Do something if Backup all options button clicked
	}
}
我们只是创建一个带有按钮的表单并检查该按钮是否被单击。此外,我们使用一些可用的 WordPress CSS 类添加一些说明文本。为了进行安全检查,我使用 wp_nonce_field() 和 check_admin_referer() 函数,了解有关 WordPress Nonces 的更多信息。
命名要生成的文件名
$blogname = str_replace(" ", "", get_option('blogname'));
$date = date("m-d-Y");
$json_name = $blogname."-".$date;
只需为文件命名,以便您可以轻松查看导出的位置和时间。
获取备份选项并编码为 JSON 数据
$options = get_alloptions();

foreach ($options as $key => $value) {
	$value = maybe_unserialize($value);
	$need_options[$key] = $value;
}

$json_file = json_encode($need_options);
这里是重要的一步,大家注意一下:
-
get_alloptions()是一个获取站点上所有选项并将其作为数组返回的函数,在本例中为$options。 - 通过检索所有选项,选项的值可能是序列化数据,因此我们必须先将其反序列化。
- 我们的目的是生成 JSON 来存储备份数据。 JSON 是一种轻量级且功能强大的文本信息存储方式。所以我们需要做的就是将我们的数据转换为JSON语法,
json_encode帮助我们实现这个目标。
ob_clean();
echo $json_file;
header("Content-Type: text/json; charset=" . get_option( 'blog_charset'));
header("Content-Disposition: attachment; filename=$json_name.json");
exit();
然后我们将 JSON 数据的内容包装在两个重要函数中,ob_clean() 和 exit() 以确保生成的 JSON 文件仅包含 json_file 保存的 JSON 数据,而没有任何其他数据。顺便说一下,我们向客户端发送一个标头请求,显示一个下载对话框。为了使其正常工作,我们应该将 ob_start() 函数放在插件代码的顶部,这可以防止发生标头错误,也许 WordPress 代码中的某些地方有一些额外的空格或行可能会导致这种情况。 p>
“JSON(JavaScript 对象表示法)是一种轻量级数据交换格式。它易于人类阅读和编写。它易于机器解析和生成。”
这是完整的导出功能代码:
function ie_export_option_page() {
	if (!isset($_POST['export'])) {
		?>
		<div class="wrap">
			<div id="icon-tools" class="icon32"><br /></div>
			<h2>Export</h2>
			<p>When you click <tt>Backup all options</tt> button, system will generate a JSON file for you to save on your computer.</p>
			<p>This backup file contains all configution and setting options on our website. Note that it do <b>NOT</b> contain posts, pages, or any relevant data, just your all options.</p>
			<p>After exporting, you can either use the backup file to restore your settings on this site again or another WordPress site.</p>
			<form method='post'>
				<p class="submit">
					<?php wp_nonce_field('ie-export'); ?>
					<input type='submit' name='export' value='Backup all options'/>
				</p>
			</form>
		</div>
		<?php
	}
	elseif (check_admin_referer('ie-export')) {

		$blogname = str_replace(" ", "", get_option('blogname'));
		$date = date("m-d-Y");
		$json_name = $blogname."-".$date; // Namming the filename will be generated.

		$options = get_alloptions(); // Get all options data, return array

		foreach ($options as $key => $value) {
			$value = maybe_unserialize($value);
			$need_options[$key] = $value;
		}

		$json_file = json_encode($need_options); // Encode data into json data

		ob_clean();
		echo $json_file;
		header("Content-Type: text/json; charset=" . get_option( 'blog_charset'));
		header("Content-Disposition: attachment; filename=$json_name.json");
		exit();
	}
}
第 4 步创建导入功能
此页面的任务非常简单,它显示上传表单并解析 JSON 文件中的数据以备份我们的选项。
创建导入页面骨架
function ie_import_option_page() {
	?>
	<div class="wrap">
		<div id="icon-tools" class="icon32"><br /></div>
		<h2>Import</h2>
		<?php
			if (isset($_FILES['import'])) {
				// Do something if a file was uploaded
			}
		?>
		<p>Click Browse button and choose a json file that you backup before.</p>
		<p>Press Restore button, WordPress do the rest for you.</p>
		<form method='post' enctype='multipart/form-data'>
			<p class="submit">
				<?php wp_nonce_field('ie-import'); ?>
				<input type='file' name='import' />
				<input type='submit' name='submit' value='Restore'/>
			</p>
		</form>
	</div>
	<?php
}
与导出页面一样,我们创建了一个表单,但这次,我们添加了一个浏览按钮,以便用户可以选择他们想要的文件并提交。
验证和更新 JSON 文件
if (isset($_FILES['import'])) {
	if ($_FILES['import']['error'] > 0) {
		wp_die("Error happens");
	}
	else {
		$file_name = $_FILES['import']['name'];
		$file_ext = strtolower(end(explode(".", $file_name)));
		$file_size = $_FILES['import']['size'];
		if (($file_ext == "json") && ($file_size < 500000)) {
			$encode_options = file_get_contents($_FILES['import']['tmp_name']);
			$options = json_decode($encode_options, true);
			foreach ($options as $key => $value) {
				update_option($key, $value);
			}
			echo "<div class='updated'><p>All options are restored successfully.</p></div>";
		}
		else {
			echo "<div class='error'><p>Invalid file or file size too big.</p></div>";
		}
	}
}
如果上传过程出错,只需返回一条死消息“发生错误”。如果没有,获取文件的扩展名和大小,将它们存储到变量中并检查它们。我们只接受扩展名为“.json”且大小小于 500000 字节的文件。如果文件不合适,则仅显示一条错误消息“文件无效或文件大小太大。”。 注意:您可以根据需要修改此尺寸。
然后,$encode_options变量将获取该文件的所有内容。由于文件中包含JSON数据,因此在使用之前我们必须先解码。为此,我们使用 json_decode 和具有 true 值的第二个参数,因此该函数返回一个数组值。有了数组值,我们就开始循环它。在每次迭代中,我们将使用相同的键及其值更新数据。最后,我们的所有选项都将完全恢复原样,并显示一条成功消息。
这是完整的导入功能代码:
function ie_import_option_page() {
	?>
	<div class="wrap">
		<div id="icon-tools" class="icon32"><br /></div>
		<h2>Import</h2>
		<?php
			if (isset($_FILES['import']) && check_admin_referer('ie-import')) {
				if ($_FILES['import']['error'] > 0) {
					wp_die("Error happens");
				}
				else {
					$file_name = $_FILES['import']['name']; // Get the name of file
					$file_ext = strtolower(end(explode(".", $file_name))); // Get extension of file
					$file_size = $_FILES['import']['size']; // Get size of file
					/* Ensure uploaded file is JSON file type and the size not over 500000 bytes
 					 * You can modify the size you want
					 */
					if (($file_ext == "json") && ($file_size < 500000)) {
						$encode_options = file_get_contents($_FILES['import']['tmp_name']);
						$options = json_decode($encode_options, true);
						foreach ($options as $key => $value) {
							update_option($key, $value);
						}
						echo "<div class='updated'><p>All options are restored successfully.</p></div>";
					}
					else {
						echo "<div class='error'><p>Invalid file or file size too big.</p></div>";
					}
				}
			}
		?>
		<p>Click Browse button and choose a json file that you backup before.</p>
		<p>Press Restore button, WordPress do the rest for you.</p>
		<form method='post' enctype='multipart/form-data'>
			<p class="submit">
				<?php wp_nonce_field('ie-import'); ?>
				<input type='file' name='import' />
				<input type='submit' name='submit' value='Restore'/>
			</p>
		</form>
	</div>
	<?php
}
为您的模板或插件创建您自己的备份功能
在示例插件中,我使用 get_alloptions WordPress 函数备份了所有站点选项。如果您想将其应用于您自己的特定选项,只需这样做:
$options = array('your_option1_name' => get_option('your_option1_name'), 'your_option2_name' => get_option('your_option2_name');
$json_file = json_encode($options);
然后继续执行上述下一步。您可以自由选择要备份的选项!
结论
在本教程中,我们将概述创建简单的备份/恢复功能。您应该注意到,我的插件只是一个简单的示例,而不是官方的。我的目标不是写一个完美的插件,而是向你展示这个功能的基本原理。通过理解它,您可以在模板或插件上创建自己的功能,也可以根据需要使其灵活。因此,您可以为您的模板/插件隔离此功能。
我希望本教程对您有用,请告诉我您的想法。你的想法让它变得更好,甚至告诉我我的错误,你的反馈真的会有很大帮助。感谢您的阅读!
偏好:
- JSON 函数
- Header PHP
- 编写 WordPress 插件
add_menu_pageWordPress 函数add_submenu_pageWordPress函数get_alloptionsWordPress 函数
以上就是简化备份和恢复设置的过程的详细内容,更多请关注php中文网其它相关文章!
留言