在之前的文章中给大家带来了《详细分析PHP中怎样定义颜色、绘制点、线和矩形?》,其中讲到了PHP中绘制点、线和矩形的相关知识,本篇文章我们来看一看,应该怎样去绘制其他的图形。希望对大家有帮助!

经过之前的文章讲述,PHP绘制基本的图形已经了解了,其中就有怎样去绘制矩形,既然矩形能绘制的话,那三角形、五边形又应该怎样去绘制呢?那么接下来我们来了解一下,PHP中应该怎样去绘制多边形。
绘制多边形
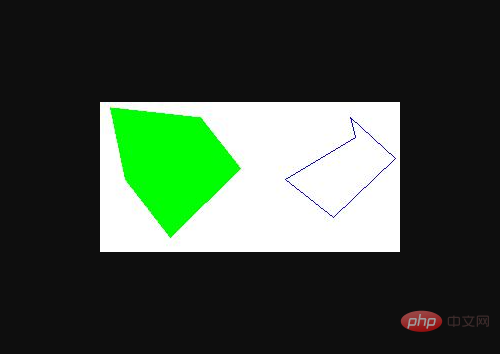
跟绘制矩形时有些相似,绘制多边形也有两个函数可以完成,就是 imagepolygon() 函数和 imagefilledpolygon()函数,它们的语法格式如下:
imagepolygon(resource $image, array $points, int $num_points, int $color)
imagefilledpolygon(resource $image, array $points, int $num_points, int $color)
之所以说和矩形的两个函数相似是因为,imagepolygon()函数后面的颜色是绘制多边形边线的颜色,imagefilledpolygon()函数后面的颜色是绘制多边形内部填充的颜色。
在语法中,$image表示的是画布 ;$points 是一个数组;第三个参数 $num_points 用来设置多边形的顶点数,必须大于 3。
示例如下:
<?php
    $img = imagecreate(300, 150);
    imagecolorallocate($img, 255, 255, 255);
    $green = imagecolorallocate($img, 0, 255, 0);
    $blue = imagecolorallocate($img, 0, 0, 255);
    $points1 = array(
        255,35,
        250,15,
        295,56,
        233,115,
        185,77
    );
    $points2 = array(
        10,5,
        100,15,
        140,66,
        70,135,
        25,77
    );
    imagepolygon($img, $points1, rand(3, 5), $blue);
    imagefilledpolygon($img, $points2, rand(3, 5), $green);
    header('Content-type:image/jpeg');
    imagejpeg($img);
    imagedestroy($img);
?>
输出结果:

绘制椭圆
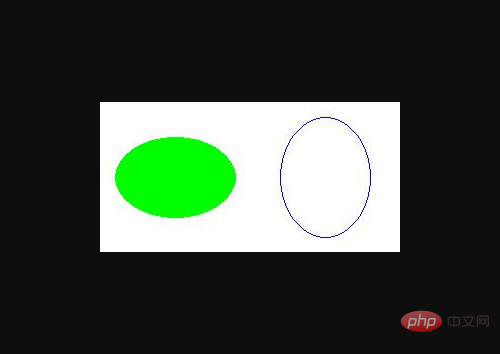
在PHP中可以通过imageellipse() 函数来绘制一个椭圆,与绘制多边形类似也可以通过imagefilledellipse() 函数来绘制椭圆并且进行填充.它们的语法格式如下:
imageellipse(resource $image, int $x, int $y, int $width, int $height, int $color)
imagefilledellipse(resource $image, int $x, int $y, int $width, int $height, int $color)
其中,其中 $x 和 $y 分别代表椭圆圆心的横纵坐标;$width 和 $height 分别代表椭圆的宽度和高度,后面的$colorb分别代表了椭圆的边线颜色和椭圆的填充颜色。
示例如下:
<?php
    $img = imagecreate(300, 150);
    imagecolorallocate($img, 255, 255, 255);
    $green = imagecolorallocate($img, 0, 255, 0);
    $blue = imagecolorallocate($img, 0, 0, 255);
    imagefilledellipse($img, 75, 75, 120, 80,  $green);
    imageellipse($img, 225, 75, 90, 120,$blue);
    header('Content-type:image/jpeg');
    imagejpeg($img);
    imagedestroy($img);
?>
输出结果:

绘制弧线
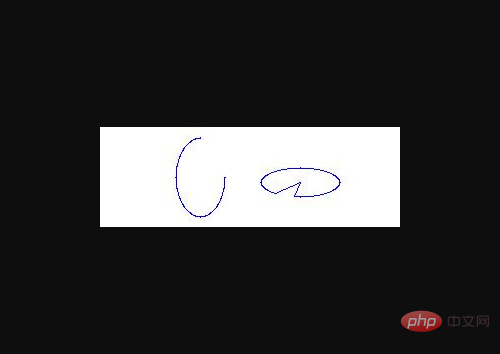
在PHP中可以通过 imagearc() 函数和 imagefilledarc() 函数来进行绘制一条弧线或者圆形,其中不同的是,imagearc() 函数绘制弧线的颜色是边线颜色,imagefilledarc() 函数绘制弧线会填充。它们的语法格式如下:
imagearc(resource $image, int $x, int $y, int $width, int $height, int $start, int $end, int $color)
imagefilledarc(resource $image, int $x, int $y, int $width, int $height, int $start, int $end, int $color, int $style)
其中 $x 和 $y 分别表示为圆弧中心点的横纵坐标;$width 和 $height 分别表示为圆弧的宽度和高度;$start 和 $end 分别代表圆弧的起点角度和终点角度。
其中还有我们需要注意的是,imagefilledarc() 函数比 imagearc() 函数多了一个 $style 参数,这个参数是用来设置颜色的填充类型的。它有以下几种:
-
IMG_ARC_PIE:普通填充,产生圆形边界; -
IMG_ARC_CHORD:只使用直线连接起点和终点,需要注意的是它与 IMG_ARC_PIE 互斥; -
IMG_ARC_NOFILL:指明弧或弦只有轮廓,不填充; -
IMG_ARC_EDGED:用直线将起始和结束点与中心点相连。
示例如下:
<?php
    $img = imagecreate(300, 100);
    imagecolorallocate($img, 255, 255, 255);
    $blue = imagecolorallocate($img, 0, 0, 255);

    imagearc($img, 100, 50, 50, 80, 0, 270, $blue);

    imagefilledarc($img, 200, 55, 80, 30, 130, 100, $blue, IMG_ARC_EDGED|IMG_ARC_NOFILL);
    header('Content-type:image/jpeg');
    imagejpeg($img);
    imagedestroy($img);
?>
输出结果:

推荐学习:《PHP视频教程》
以上就是PHP中怎样绘制多边形、弧形和椭圆?(图文详解)的详细内容,更多请关注php中文网其它相关文章!

声明:本文原创发布php中文网,转载请注明出处,感谢您的尊重!如有疑问,请联系admin@php.cn处理
- 上一篇:详细分析PHP中怎样定义颜色、绘制点、线和矩形?
- 下一篇:没有了